
DIY Wedding Sign
Thursday, July 19, 2012It's painting time again! Today's DIY is going to be wedding signs to lead your guests to specific locations on your wedding. Or perhaps just for decor.
You'll be needing:
- wood (i used balsa wood)
- sponge brush
- acrylic paint
- stencil
- saw (or borrow one from your neighbor)
- saw guide
- pencil for guide
- varnish (optional)

First step is to cut the wood to make the arrow tip. I cut the balsa wood into half first to make the two signs. Each sign is around 14 inches long. Depending on how short you want your sign to be, you can simply use a pencil to draw the line and then carefully cut that with the saw. Be very careful with this. If you are using balsa wood like I am, it'll be quite easy to cut since it's light and feels like you're just cutting through a styrofoam.
Now this is an optional step. If you think the wood is too light, you can just buy a varnish to darken the wood. Grab any old cloth and just wipe it over the wood back and forth. Let it dry overnight before doing anything else.
Next, is to print out your stencils. Print your text in a piece of paper then cut the letters out. As you can see, I added a forest icon beside the 'I Do' since our ceremony was in the woods and a spoon and fork sign for the 'We Did'. That way it'll be easier for your guests to read it.
When you're stencils are done, wrap it around the wood (like below) and make sure you tape it nice and tight so it won't move when you're painting it.

Last but not the least, take out your sponge brush and have fun! Just dab the sponge brush on the stencil lightly until the whole letter is covered with paint.

Again, let it dry overnight.
There are a few options to put your wedding sign up. You can either nail it to a tree, nail it to another wood then stake it to the ground or hang it like how we did it.
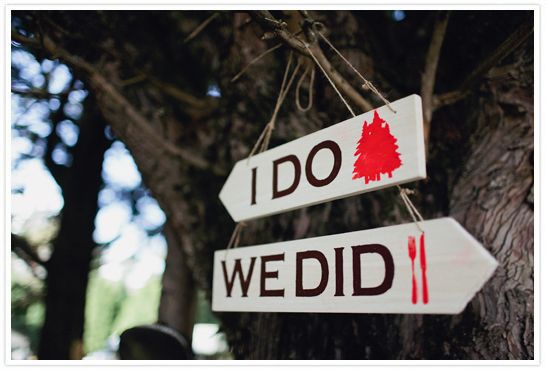
{Photo by Sayher Heffernan}
xoxo


0 comments